


If you just received a set of anthropomorphEYES in the mail and are jouncing to do something special with them *wink* – I will walk you through the process so you can create a personality for your appliance that is all its own.
To reprogram your eye boards, you’ll need an AVR programmer of some flavor:

…and a 2×3 segment of extended male pin headers:

The shorter end of the pin header goes in the programmer’s cable doodad like so:

This allows you the straddle a row of pins along the top and bottom of your eye board so that all of the pins make contact with the programming pads (the side of the cable with the red stripe should line up with the little arrow on the board):

Once aligned properly, all you need do is pinch the headers to make firm contact with the board while you are uploading your code. This design helps keep the board free of any permanent bulky programming headers.
After you grab your pin header and AVR programmer, you will first need to download my source code off my gitHub repository in the directory: (code/eyeOfToast) and supplementally, the “expression worksheet” (documents/expressionWS-01.jpg )to go along with it (this will help, trust me!). Locate a highlighter, or light colored sharpie… and you’re in business!
The worksheet looks like this:

It’s blank so that you can experiment by coloring in the segments to see what types of emotions you can come up with! Just take notice of the numbers inside each segment- make sure you can still read them through whatever marker you choose to use.
It might be helpful to view the worksheet as a story board. Think of how you would chain together different expressions to create an animation- or complex display of emotion, then draw them up in order.
Once you come up with some expressions for your eyes, you’ll need to add them to the code as an array. =o
If you have no idea what this means, don’t worry. It isn’t hard to wrap your head around once you see what you need to do 🙂
- Download the base file “eyeOfToast” from my gitHub in the code directory, open it and find the first banner that reads “this is where you add your expressions”.
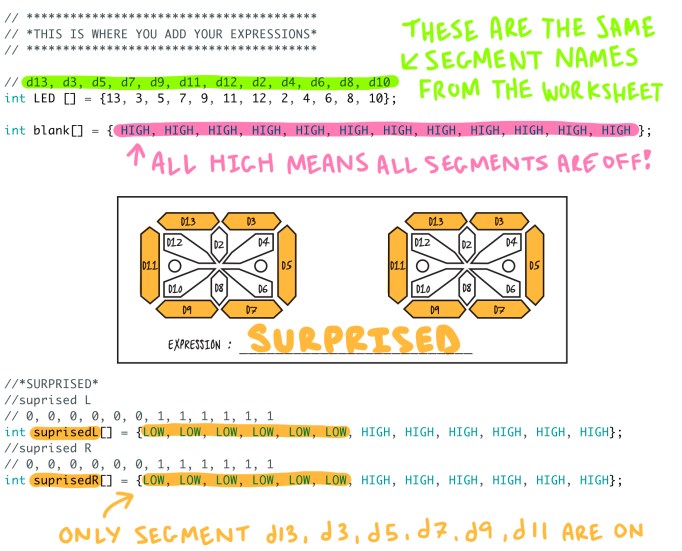
- (green) You’ll notice an array in parenthesis. These pin numbers correspond to the names of the segments on your worksheet! The order they’re in will correspond to the order in which you define your array.
- (pink) To turn an eye segment on, you must put the corresponding pin in the “LOW” position. To turn a segment off, you must set the pin in the “HIGH” position. As such, the “blank” setting has an array set entirely in the “HIGH” position.
- (orange) To create the “surprised” expression (which turns on segments d13, d3, d5, d7, d9, and d11), you must set the corresponding positions in the array to “LOW”.
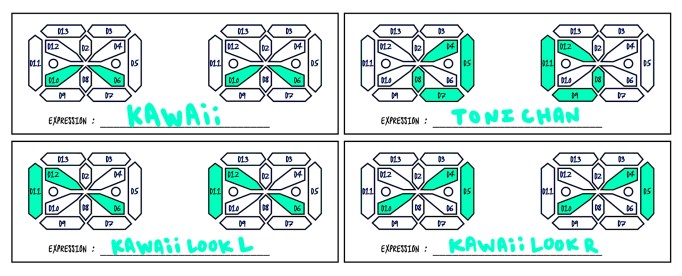
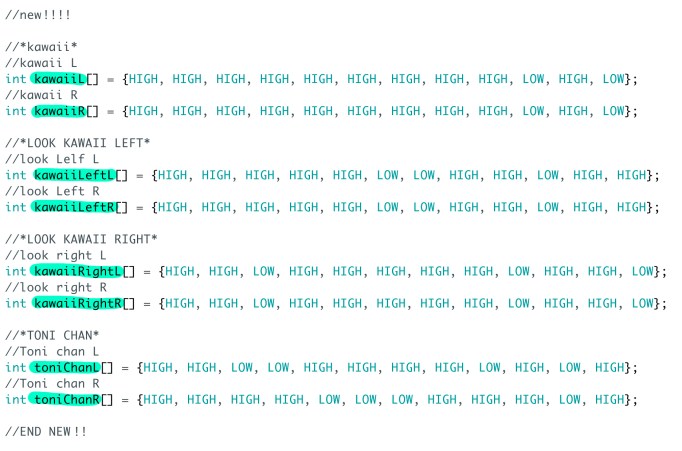
*EXAMPLE* If you made your own expression called “kawaii” on your worksheet and it looked like the picture below, then only segment d10 and d6 would need to be set in the “LOW” position in the array (d10 is the last position in the array, and d6 is the third-from-last).
NOTICE: I renamed the part at the beginning to say “int kawaiiL[] = …” and “int kawaiiR[] = …” . This defines the name of the emotion and set the expression the same for both the left and right eye. Since both eyes are the same for this expression, the array is also the same.

Once you get a hang of how the positions of the segments in the arrays work and are comfortable setting them as “on” and “off”, you can add or replace as many expression in your code as you like!
The next step however is to take you individual expressions as still frames, and chain them together into animated displays of emotion.
First you’ll want to get an idea of what expressions will transition into one another. Here are some things to consider when doing this:
- How often would your appliance blink?
- If it looks away, to which direction and for how long?
- Would it roll its eyes?
- Would it change its expression frequently like its hyper or nervous?
For my example, I started to create a basic personality for my friend Tony’s rice cooker. He told me he wanted his cooker to be “anime happy”- so taking this into account I created the “kawaii” expression that was used in the example above, a “kawaii look left”, “kawaii look right”, and an expression I’ve called “Toni chan”:
In the code, the appropriate arrays for these expressions look like this:
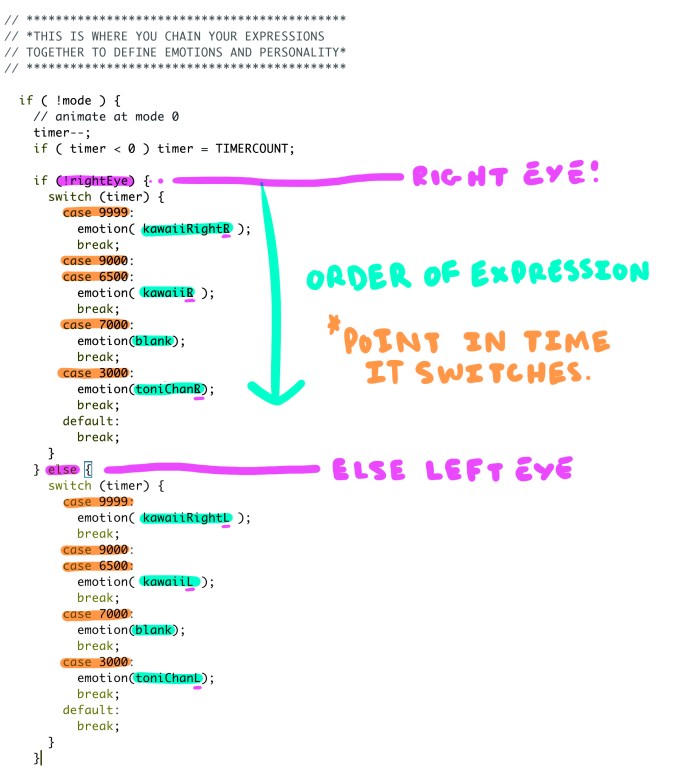
Now to create your animation, you will need to visit another portion of your code towards the bottom. There is a short list of commands and pauses. Think of this as a timeline that is counting down, and it is up to you at what point during the countdown you would like your eyes to change to a new expression.
In this short example, I am counting down to 0 from 9999. Imagine that ever 1000 is approximately a second long. At points “9999”, “9000”, “6500”, “7000”, and “3000” the expression changes to whatever is designated in the next line of code in the parenthesis. NOTE: this first section is only for the right eye.
You will repeat the same exact commands in the next section of code, but for the left eye.
You can of course make your code as long and as complex as you’d like. The code that comes loaded on your eyes is the file “anthroEYES_judgmental” in my GitHub repository, you’ll notice that the sequence for the default “unamused” disposition is much longer.
Be the first to comment